How to Use Guy Line Tensioner?
Do you know how to use Guy line tensioner? I understand that’s pretty confusing and might drive you crazy.
No worries, I’ve come up with some easy and handy steps that will help you to understand how these little things work.
If you’re planning to join any camp or tent, there is no way you can ignore the importance of Guy line tensioners. These are the ultimate savior of your tents in adverse ambiance. Guy line tensioners can provide stability, protection, ventilation, safety, and comfort to the tent/ rain flies.
But, setting this little thing up is always tricky. Some people end up making a mess because of not knowing the proper steps.
However, stick with the writing and learn everything about Guy line tensioners and their setup procedure.
Why Do You Need a Guy Line Tensioner?
Guy line tensioners are the savior of your tent setup. They are the tiny strings that can hold up your entire tent in the proper structure. Some might think that poles are enough for this task.
But, in reality, Guy line tensioners make things much more manageable. Here you don’t need to know hundreds of tricky knots to set your tent correctly. Just get one of them from your nearest hardware shop.
It’s understandable if you ask what’s the purpose of using a Guy line tensioner. Well, till now, you must have known that Guy line tensioners are related to the tents and their security. Let me explain its purpose to you. That’s how you can get into the depth here.
So, Guy line tensioners are helpful in many ways. As:
Flexibility:
Guy line tensioners can ensure flexibility to your tent. Even if you’ve never dealt with tents, you can cut off all the hassles with this tool.
Here you can get the flexibility to adjust the tent to different degrees. This will allow you to build various shapes and angles.
Also, you can get the flexibility of setting tents in unfavorable locations. Sometimes hard and uneven surfaces can create issues with the optimization. No matter how harder and softer the surface is, good tight flexibility can offer you easy optimization.
But here, you need to make sure that the Guy line tensioner you’re choosing offers adjustability. The non-adjustable ones can’t provide enough flexibility with the use.
Ventilation:
Guy line tensioners can do some fantastic tasks with your adjustment in the tent. One of the most impressive facilities you’re getting here is proper ventilation.
Proper ventilation stands as an issue for people. The thick tent wall and protection can undoubtedly interrupt air circulation in your tent. The Guy line tensioner can help you to make the two walls separate.
This proper separation will allow maximum air circulation by keeping your tent still secured.
Safety:
The Guy line tensioners are the tiniest tool in your tent package. But this is one of the most important things to provide maximum safety in your tent.
Especially when you’re in some unappealing weather, a Guy line tensioner will keep your tent safe. When the weather is not going as expected, make sure your tent is sealed correctly. The lower temperature, humidity, heavy wind, and rain can defect the tent set up.
In such circumstances, your tent must be safe. Guy line tensioners can help you out quickly from those tricky situations.
Adjustability:
Guy line tensioners are easy to adjust. Generally, people refer to various types of artistic knots to secure tents.
But the Guy line tensioners can cut off these minor but stubborn issues. You just need to learn some basic knots with the Guy line tensioner. Also, you can create more spaces by only pulling out the sagged area of the tent.
Well, these are the basic things that make Guy line tensioners this valuable. You’re getting to keep your tent safe, flexible, dry, and ventilated. What’s more, you can expect this tiny tool. I know setting this tiny tool is not that easy. But stay with us and learn more about Guy line tensioners.
How to Use Guy Line Tensioner?
Here I’ll mention the guideline about the Guy line tensioner setup. You must use the guy rope to seal the tent correctly.
This is the thing you should carry with every campaign. Some people make a loop with the Guy line rope and enter the tent stake through to put it into the ground.
Well, honestly, I’ve tried that procedure before. But that’s not the ultimate right thing to do. Your tent can fall and hamper ventilation if you set this in the wrong way.
After all, your Guy line tensioner will secure the tent stake with the ground. Now you can guess how crucial the setup steps are
I must say, Guy line tensioners might make things tricky for you. But things might get more accessible for you if you follow some instructions here. I’ve discovered and made a note of each step by myself.
Follow the instructions here:
You can get your Guy line tensioner strung up from the market. If they are not strung up, you need to tie a knot there. Make sure you’re making the knot at the end of the line properly,
Then you need to take the Guy line rope through the middle hole of your tensioner. Now Back it out through the bottom hole.
You need to remember that a Guy line rope knot is much more than just a knot. Here you have to check the slack too. Make sure you’re making the Guy line rope knot closest to the knot. For that, you have to feed some slack through the hole.
Now you can pull the rope to check the sealing. The ultimate loop will hold the tent stake. Make sure the loop is strong enough.
Before you use the tent with a Guy line tensioner, make sure you’re giving it a final check. Just hook it through the tent stake and adjust it. If you want to check the slack adjustment, tilt it and pull it out a little bit more on your side.
Those are the ultimate instructions on how to use Guy line tensioners. This little thing can save your life.
How to Attach a Guy Line Tensioner to Your Tent Rainfly
Rainfly is another thing that can cause unstable issues without proper sealing. Why don’t you try the Guy line tensioner as a better and easier solution? You could grab a Guy line tensioner. It’s the ultimate solution with rainfly tent security.
Just attach the Guy line tensioner to your rainfly and rely on it in any circumstances. Follow the steps mentioned below to attach a Guy line tensioner properly:
- Firstly, you should start with the laying stage. Here you need to make a tony loop in the line of your hand. Try to use your left hand to make the rope accessible. When you see the rope hanging, make a loop as you want.
- Next, you need to get the end part of the rope and check the hole properly. You should make the hole in the length, here a rabbit can as through the loop. This will be the perfect loop to get adjustability.
- Then, you should wrap the Guy line and back down through the loop.
- Now, you should tighten the knot. Here you need to hold the standing Guy line and pull it on to make this accessible.
How to Tie and Stake Down a Guy Line?
For tying the stake down a Guy line, you can simply follow the mentioned steps below here:
Step 1: First of all, you should search for the guy out the loop on your tent. Most of the tent comes with attached Guy lines.
You have to attach the Guy line into the loops. You’ll find this somewhere in the corner of the tent. But tight also be somewhere on the tent edges and wall.s Don’t forget to check that out.
Here you need to use an uptight cord to prevent any fall out of your tent. Here you can use twine and string instead of a cord.
Although, you might get the Guy line loops attached already to your tent. But you should always be conscious about the Guy line rope strength. Most of these guidelines are poor. You should
Cut these lines off. This step will allow you to get more flexibility.
Now, it’s time to secure your Guy line knots. You need to attract the Guy line into the loop with a knot. Here, you need to do some knotting. Here you can use either a clove knot, bowline knot, or two half hitches. The bowline knots are mostly not adjustable.
Step 2: Now, you need to adjust the stakes with the tent. You need to check the ground type. This will lead to how you should adjust it on your ground.
Here when you are using a Guy line tensioner, you don’t need to do any knots. This will make the procedure super handy. Here you can lengthen and shorten the Guy line.
Step 3: Finally, it’s time to stake down the tent properly. Here you need to stake the tent down. Make sure you’re keeping the Guy line straight. This will get you more flexibility while adjusting the tent.
Step 4: once you’re done with the adjustment, make sure you give it a final check of the Guy line strength.
These are the easy steps you should follow while tying a stake down the Guy line. For better and more explicit instructions, you can check out some instructive videos online.
How to Choose The Right Type of Guy Line Tensioner?
For ensuring maximum flexibility and security, you must go for the correct type of Guy line tensioner. Never settle down for a cheap tensioner to save some bucks. This might create a real issue with your tent.
However, the correct type of Guy line tensioner will depend on the tent type. You’ll find various kinds of Guy line tensioners available in the market. Here I’ll mention the basic and popular types of Guy line tensioner. You can pick any of these for your tent.
Give check here:
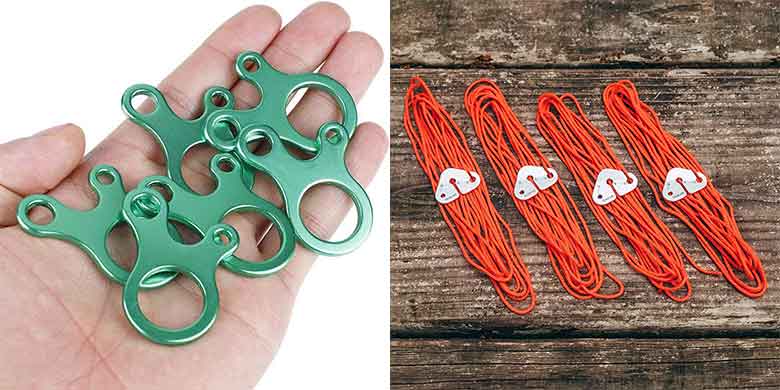
Bar tensioner: Bar tensioners are primarily interesting in design. These are easy to use, stronger to hold. The core material of this type of tensioner is aluminum.
With a bar tensioner, you need to thread the end of the cord through one side of the tensioner hold. Then, you can back it through the other hole. There it’ll take a “U” shape. Now, you can tie a simple knot and pull it tight. This is how you can use a bar tensioner.
Line lock 3’s: This one makes Guy line tensioning much handy. Here you need to simply attach the lock to the Guy line by threading the cord through it, Then pull the line to make your preferable adjustment.
This type of tensioner comes in the material of polyacetal/ ABS. So, you can expect reliability in your campaign.
Line Lock: Line lock is the most common and critical one to use as a tensioner. This type of tensioner can provide maximum security. You can easily adjust the tensioner for tightening or loosening the Guy line.
These are the three different types of Guy line tensioners. Which one you should use will depend on your tent and surface type. But, in my experience, the line lock one would be the ultimate winner among these three.
Frequently Asked Questions
Question: Why is it called a Guy line?
Answer: Guy line stands for guy rope. Guy line works for guiding or securing your tent. That’s the reason it’s called the Guy line.
Question: How long should the Guy line be?
Answer: Guy lines can vary in different sizes and lengths. This can range from 8 feet to 4 feet. You should always measure the Guy line length before choosing them. Try to go for the longest one So that you can cut that off according to your need.
Conclusion
Not everyone has the time to learn hundreds of knots before going on a camp. Also, these are lightweight and cheap. So, anyone can carry a Guy line tensioner for an easy tent setup. This article has explained to you everything about Guy line tensioner. Hopefully, now you know how to use Guy line tensioner. Get your one now and try this out on your next camp tent.


