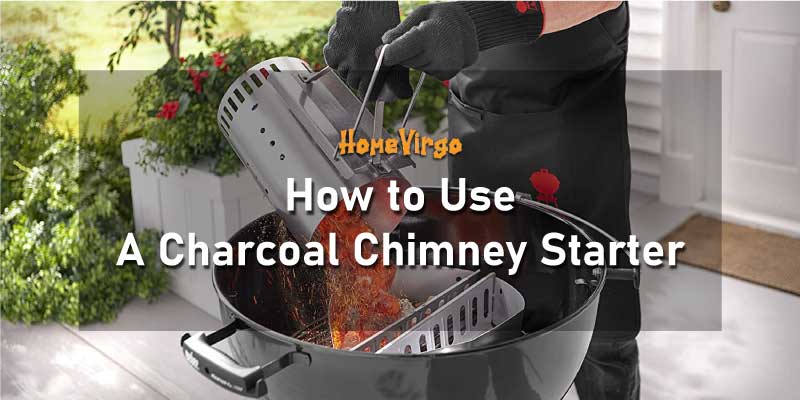
Charcoal Chimney Starter
Going grill with charcoal is pretty easy if you know how to use a charcoal chimney starter in the right way. Well, you should not beat your brain out anymore thinking about it since we are here with the proper guidelines.
In this article, you will get to know the ins and outs of using a charcoal chimney starter along with the reasons you should use it and so on. Also, there we have put an FAQ section in case, you leave having any confusion regarding this topic. Sounds promising? Well, there you will have more.
Let’s get started rather than having chitchats.
Why Use a Charcoal Chimney Starter
A charcoal chimney offers you an even temperature while the charcoal gets hot. If you only use a lighting fluid or a lighter on its own, well it will not be as effective as charcoal.
If you are using a charcoal chimney starter, you don’t even want to use any BBQ lighter fluid that may result in an unpleasant taste in your food especially when you don’t use it correctly.
If you get a quality chimney starter, it should come with a simple design. Simply describing, it’s predominantly a hollow metal cylinder that contains holes on both sides.
It should come with a wire grate inside as well as a handle set that holds the starter when you tend to pour the charcoal.
How to Use a Charcoal Chimney Starter- 5 Easy Steps
Now, here’s how to use a charcoal chimney starter. Let’s get to know what you are going to need and how you can do the job properly.
Things You’ll Need
- A charcoal chimney starter
- Newspaper
- Lighter
- Heat-resistant gloves
Step 1: Place a Newspaper to Your Chimney
You will find two sides of your chimney while one side is deep enough and another side is shallow. You need to deal with the paper only for the shallow side because the deep side will contain charcoal.

Take a newspaper and compress it in the first place. After that, put it inside the shallow side of your chimney, make sure you put it loosely. Why you should never pact it too tightly is it may smother out.
Then, you should turn the chimney over and then move on to preparing the charcoal.
Step 2: Place Charcoal Into the Chimney
Now, mark the deep side of your chimney and add charcoal to it. In case, you are dealing with lump charcoal, you should put the smaller lumps at the bottom, however, above the paper. It’s because smaller lumps will be heating up so fast.

You may find some pieces so large in size and if you put them at the base, it may take longer for getting them lit.
Step 3: Light the Paper
Next, you have to put the chimney on to your grill. Hold the paper and then, light it in several places, then what? Nothing but watch it burn! You will see smoke emerging right after the paper is consumed by fire.
The chimney will be forcing up the flame as well as the holes on your chimney will be creating perfect venting.
Now, you need nothing but to wait and watch. Wait for around 20 minutes.
Step 4: Dump Charcoal Into the Grill
After 20 minutes, get back to the charcoal. You will find charcoals begin to glow as well as you will see the fire traveling towards the top. Once you see enough embers and you find the top charcoal becoming pale, use a heat-resistant glove and then, dump all the charcoal into your grill.

Some people do this job in another way, they dump the charcoal by following a two-zoned or an indirect cooking method. However, this is the most used way to set the charcoal evenly.
Step 5: Get Cooking
And, it’s time to start cooking! The last thing you’re going to do is, place back your grate over the top. In case, the food you are cooking takes a while, you should maintain a basic rule- refresh the charcoal every 45 minutes.
And, for the long cooks, if you want to stick to your kettle-style grill, you can purchase a grill grate that opens for refreshing the coals.
Tips to Make Newspaper Burn Longer
Well, you will love this trick that will make the newspaper burn much longer in your chimney starter. Once you put the newspaper inside of your chimney, take a non-stick cooking spray and give it a light spray.
It will make that newspaper last long because it will burn only when all of the oil burns.
Another point worth mentioning here, you should know how to light only small amounts of charcoal. Because there are times when lighting only a few briquettes is needed, for example, when you follow the minion method.
Let’s get to know about 3 effective ways for lighting only a small amount of charcoal.
- Simply turn your chimney upside down. Next, put the charcoal in the bottom that is now the top actually.
- The second thing you can do is to bank every briquette against one side of your chimney.
- Get a coffee can (bottomless) and put every briquette inside of it. Finally, put it in the center of your chimney.
And, if you ask whether it’s okay to use leftover charcoal or not, well, it’s totally okay. But you have to make sure that you remove all the ashes or as much as possible at least.
Then, the next thing you should do is to fill half of your chimney using fresh charcoal. After that, just place those leftover charcoals on the top. It will increase airflow in your chimney starter because used charcoals will be packed too closely.
What If You Don’t Use Newspapers?
Don’t worry if you are not willing to use a newspaper to do this job, there’s a way around this, you can simply use Weber Lighter Cubes instead. It’s even an easier and more clean way to get the job done.
If you purchase the paraffin wax cubes, well, they are going to burn at 1300℉. And, they can burn at this temperature for around 10-12 minutes.
To get started, take the number of charcoals you need and fill your chimney with them. Then, set it aside. Take 1-2 lighter cubes, and then, put them on your charcoal grate. Then, use a butane lighter to light it. Done? Now, lift up your chimney and then keep it over the burning cubes.
The coals will be lit in only 10-12 minutes though it depends on the conditions of wind, what type of charcoal you are using, and how much charcoal you are dealing with.
Once you notice the orange-colored flames inside of your chimney starter, the ashes start forming on the charcoals, your charcoal is totally ready. Finally, you need to dump those charcoals into your cooker, and you are done!
More Lighting Alternative Options
In case, neither the newspaper nor the lighter cubes can be your cup of tea, there are more options you can try with. Such as…
- Sawdust starters: Paraffin wax and recycled sawdust are the main ingredients of these starters. You only need to break them into chunks or simply cut them and then place some of the pieces under your chimney. Some models come in easier settings that you may need only to strike their heads against the lighting strip and then place them under your chimney.
- Alcohol-based liquid gel starters: These ones move with a lot of force and lit. You should not get confused between charcoal lighter fluids and gel starters because gel starters do not have any petroleum products that smell foul.
- Wick chafing fuel: Here’s another option you may choose. You only need to light the wick as well as place it under your chimney. Then, wait for around 10 minutes. You will find these disposable units at the local stores around you and the units will be burning for 2-6 hours.
Also, you can spray some sheets of paper towel with a non-stick cooking spray and it will be enough to get the charcoal started. Also, these sheets burn even more completely compared to a newspaper, so things will not be messy. And, using paper charcoal bags or cupboard egg cartoons are okay to use instead.
Safety Precautions to Use a Charcoal Chimney Starter
Some safety precautions you should always keep in your mind and follow properly while dealing with the chimney starter. These are:
- While you are dealing with a hot chimney starter, make sure you wear heat-resistant gloves in the first place. Wearing closed-toe shoes is also a great idea. Otherwise, there are chances of hot charcoal pieces falling out of the bottom of your chimney.
- Always keep in your mind- your chimney is going to remain hot for some more moments even after you pour out the charcoals.
- Avoid placing your chimney starter near any flammable material such as dry grass or a wooden deck.
- While handing with fire, make sure there is a fire extinguisher nearby you.
- If you ever planned to light your chimney starter on a concrete surface (directly), don’t do this. Do not ever do this because heat from your chimney can lead that concrete to explode.
- While it’s about choosing a safe location to light your chimney starter, you should think about- on another grill’s grate, on the fire-safe bricks, you may find on your patio or deck, or on the charcoal grate.
If you can follow all of these, it means you can seal the chances of happening any unwanted situations while handling your chimney starter.
Frequently Asked Questions
Conclusion
And, it was all about how to use a charcoal chimney starter. Since we tried our best to come up with the to-the-point information, hopefully, you got right what you wanted.
Dealing with coals and hot chimney starters is not something hard if you take enough safety precautions. Make sure you practice the ‘safety first’ stuff while handling the hot chimney starter.
Pour and arrange the coals perfectly and make sure they get even heating, that’s all you need to take your cooking to the next level. So, yes, go for it without a delay, wish you good luck!