How to Blend Colored Pencils Correctly

Our Best Tips on How to Blend Colored Pencils Correctly!
Learning how to blend with colored pencils has the potential to take your art to the next level. It’ll unlock your ability and let you achieve diverse and specialized works of art. You’ll be able to produce results that are unique and truly express what you want it to.
The main issue you’ll face is conflicting advice and tips that are hard to understand and realistically use.
This guide is here to help you fill in any knowledge gaps you might have. I want to give you a thorough understanding of how each tip works and the products you’ll need.
Blend The Colored Pencils DIY
By the end of the guide, you’ll be able to decide which style of colored pencil blending will give you the effect you’re looking for.
You’ll be comfortable choosing which products will be best to use, and how to use them. You can expect a full introduction to this fascinating topic – getting you started down the right path right from the start.
If you already know your way around pencil blending, this guide will be a great refresher and maybe give you a couple new ideas to work with.
Blend the Colored Pencils
There’s a lot to learn here, but don’t let that put you off. I’ve broken the whole process down into smaller tips that you’ll be able to easily understand and put into use.
There are different types of pencils and blending techniques. Each type might have a preference when deciding which additional products you can use for getting the best results. This guide will discuss a couple techniques you should become familiar with when learning how to blend with colored pencils.
How to Blend with Colored Pencils.
Some of these will take time to master, and some are suited to beginners to get started with.It’s up to you to decide which of the techniques suits the style you’re going for.
We aren’t going into depth on each of the techniques – but I recommend you take the time to research them thoroughly. You’ll need a solid understanding of them if you want to be able to manipulate them and unlock your full potential.
Here are the Techniques for Blending Colored Pencils We’ll be Talking About:
- Using a colorless blender
- Using solvent for blending
- Using a powder blender
- Blending with rubbing alcohol
- Using water as a blender
- Using Vaseline as a blender
- How to blend with prismacolor colored pencils
There are the artistic techniques for blending colored pencils, but that’s not really what this article is aiming at.
The focus here is on using external products and items to achieve specific results.
- How to Build a Gas Fire Pit Step by Step Instructions
How to Blend Colored Pencils with Colorless Blender.
A colorless blender has the same shape as your standard pencil. The main difference is that it has a wax core that helps to spread the colored pigments. It helps you create a very smooth and pleasant texture that few other methods are capable of creating.
There are a couple different brands that offer these kinds of pencils, so it shouldn’t be too hard getting your hands on them.
There Are Two Main Benefits to Using Colorless Blenders:
- You don’t need to add as many layers of color – saving you time and letting you get more from your pencils
- You’ll be able to shade lighter colors without actually making changes to the color itself
It’ll smooth out the textures of the pencil and give it a smooth and soft appearance.
Just make sure that you apply enough color before blending, or it won’t have enough thickness to work with. Colorless blenders are great for using when drawing eyes, skin and other smooth tone textures.
How to Blend Colored Pencils with Solvent
There are different levels of aggressiveness when using solvents to blend. The mildest of these is rubbing alcohol – and this is the one we’ll focus on here. The other two are less beginner friendly and take some experience to get good results with.
How to Blend Colored Pencils with Rubbing Alcohol

The rubbing alcohol helps to break down the bonds that keep the colored pigments together while they’re in pencil form. When you break down these pigments, you’ll get a super-smooth finish. It lets you spread the pigment across the paper.
Here’s what You’ll Need to Do:
- Get a couple layers of color down – you won’t need as many as burnishing, so don’t go at for too long
- Lightly dampen a paintbrush into the solvent
- Begin to gently brush the colors together
- Wait for the paper to completely dry before applying more
Here Are a Couple Things You Need to Be Aware of:
- Not having enough color will result in spotty and uneven finishes
- Don’t use too much solvent at one time as you could damage the paper
There are other solvents that you can use such as turpentine. Beginners shouldn’t really be dealing with that – rubbing alcohol blending is a great place to start and you can move up from there.
How to Blend Color Pencils with Water

Using water to blend colored pencils can give your work a very unique look – sort of resembling an oil painting, but not as soft. You’ll also be able to overlay the water blended finish with more burnished layers to give you drawing complex coloring and interesting features.
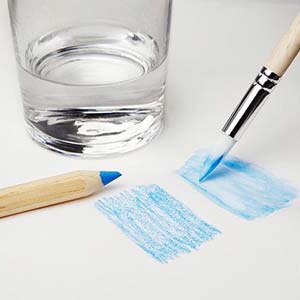
- Here’s how to blend color pencils with water:
- Put a couple layers of color down before using any water
- Use a brush that’s quite firm and capable of spreading the pigments across the paper
- Dampen the brush in the warm water (don’t soak it)
- Gently brush the colors together
- Let the page dry before repeating this process
You’re can use a cool fan to dry it quicker if you’re in a hurry, though I recommend you just stick with natural drying. You can also use cool water effectively – I prefer using warm water as it feels easier to work with.
How to Blend Colored Pencils with Vaseline.
Vaseline (aka petroleum jelly) is great for smoothing out the colors and making it appear more even. The more saturated parts will be evened out and the lighter color glow won’t be so pronounced.
Here’S What You Need to Do:
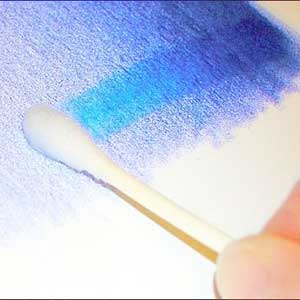
- Once you’ve laid down a couple layers of the colors, layer some Vaseline onto an ear bud
- Smooth the colors over with the ear bud until the borders are smooth and you’re happy with the result
- Repeat this process as much as needed
It’s better to use less Vaseline than more. It’s easier to apply more than it is to remove a layer. Go easy when first trying this method out. You’ll find your feet along the way and get into your own rhythm. This method is excellent for skin tones and for drawing portraits of people. The Vaseline makes the skin glow a little and comes across as very realistic.
How to Blend Colorless Pencils without a Colorless Blender.
This question has probably crossed your mind once or twice throughout this guide. “What if I just want to blend colors without using any of these liquids or products?” It’s a fair question to be asking – and has some awesome hidden potential locked inside it.
There are a couple effective ways to blend colored pencils – though the techniques often take a little time to get right.
With some practice and dedication, you’ll have it down to an art. It’ll give you the versatility to work without needing any external products or liquids, and create some unique effects along the way.
Blending Colored Pencils by Burnishing
Burnishing involves blending the colors together by applying heavier pressure to force the colors together. This is quite technical and not easy to get right the first time. You’ll need to practice quite a bit before you can put out the same results that the other methods here can. It’s generally better to use a lighter color for the burnishing. The results will appear smoother and more pleasing overall.
Using darker colors can be used when you’re going to specific effects – though, you’ll need to build up your skill before going down that path.
Dry Blending.
You’ve probably done this before during your school years. This involves using a tissue, your finger, etc. to manually smooth the colors together.
It’s a great starting technique to learn how to blend colored pencils for beginners! You probably won’t get the same smoothness and finer textures – but you’ll get good results when starting out.
With some time and practice, you can get some exceptional results.Dry blending can produce that retro effect and give your drawing some interesting shades. It’s quite effort intensive and can get tiring pretty fast – so use it wisely. You’ll quickly learn the potential of this blending style along the way.
Final Thoughts
These colored pencil blending techniques are unique and deliver you a versatile pallet of results. Over time and with some intentional practice, you build a sense for what technique will work best – and when!
I shouldn’t take you long to fall in love with these techniques and all they can do for your art.Now that you know everything you need to about how to blend colored pencils; you’re be ready to put it into practice – and get some eye-catching results!


