How to Clean a Box Fan Quick and Easy in 20 Minutes

When You Think about How to Clean a Box Fan, What Comes to Find?
 For me, I thought it would be a headache to take it apart. For you, it might be the dirt that puts you off. The 20 minutes it takes to give your box fan a thorough cleaning is well worth it. You’ll save money on not needing to buy a new fan, and the time it takes to find the right one.
Our guide breaks down the exact steps you’ll need to follow to clean your box fan as quickly and easily as possible. We’ll tell you what you need to get it done, and how to use it all.
Let’s get into the guide!
How to Clean a Box Fan
I used to hate it when my parents would tell me to clean the fan. It would take me forever and I hated every second of it.
Turns out I was as efficient as cleaning the fan, as a fish is at climbing a tree – I did it all wrong. Having the right tools in your arsenal, and knowing the right process makes all the difference.
If you’re looking for interesting ways to use your box fan around the house, tips on using box fans in the house to get you informed and give you some great ideas!
Let’s get into the steps you need to follow to clean your box fan the right way.
How to Clean a Pelonis Box Fan
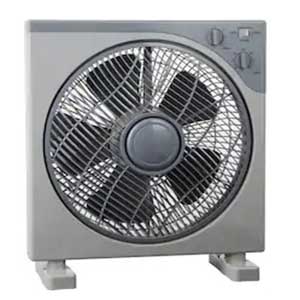
We’ve chosen to look at the Pelonis box fan as our example. If you can take this baby apart, you can take apart any cheap fan in a matter of seconds.
Here Are the Tools You’Re Going to Need:
- A screwdriver that fits the screws on the frame
- Flathead screwdriver to release the plastic tabs if they’re tough
- Paper towels
- Window cleaner (Windex is fine) – you can mix it with vinegar for an even better clean
- Handheld vacuum cleaner
- Brush for cleaning the grate (an old one is better)
- A baseball bat if you get bored (jokes – please don’t hurt the fan!)
Once you’ve got all these tools together, move on to the next steps.
Note: Remove the power chord before moving on to any of these steps (if you can).
Step 1: Removing the Grate
First off, check to see if your box fan has screws holding the guard grate in place. If it does, you’ll need to remove these. Keep them separate and don’t lose them.
Once you’ve removed the screws, you’ll need to remove the plastic tabs. Not all box fans have these and they can be tough to unclip sometimes.
Your box fan might not have screws at all. If that’s the case, just unclip or remove the plastic tabs that are holding the grate in place.
Do this for both sides of the fan.
Step 2: Take the Guard Grates Outside and Beat Them
No, not with the baseball bat – though that would be fun! Take the screens outside and beat them with a large towel or cloth to remove the large clumps of dust and dirt. This will make the wipe down later on much easier.
Step 3: Vacuum the Inside of the Fan
Use the vacuum to suck up all the clumps of dirt inside the fan. Vacuum once over on the blades and motor unit, but don’t be too concerned about the dirt that doesn’t budge – we’ll deal with that soon.
Try to get a good vacuum on the inside edge of the frames, they tend to collect a ton of dirt.
Step 4: Wipe It Down
This step will probably be the biggest time sink. Wipe down everything with Windex and paper towels. You can mix the Windex with some warm vinegar if the dirt is particularly resilient. If you see dust, wipe it away.
Once you’re done with one side, flip the box fan over, and repeat this process. Keep flipping and wiping until all the visible dirt has been removed. Vacuum any clumps when you need to. Be careful not to let any liquid drip into the motor area – so be careful when you clean over that area.
A Quick Tip: Spray the cleaning liquid directly onto the paper towel, not the fan itself.
Step 5: Brush the Guard Grates
Take the screens to the kitchen sink and use the old brush to get all the dirt out. This can get pretty dirty, so be prepared. Keep the water running to wash away any dirt buildups and this won’t take long.
Just keep repeating until you can’t see any dirt. Once you’re done with one screen, take it somewhere to dry while you clean the other one. It won’t take long.
Step 6: Reassemble the Box Fan
Take some to make sure that the plastic tabs are clipped in place before you put the screws back in. If you don’t do this right, you might get annoying rattles and shake from the fan.
Once everything is back in its place, reconnect the power cable and turn on the fan. You should feel the difference immediately!
How to Oil a Box Fan
It’s recommended to oil your fan when the seasons change, or when it’s particularly dry out. I usually use gear oil, and it’s likely the best oil for you too. It’ll last a good while and keep the fan moving smoothly.
Here Are the Steps to Oiling Your Box Fan:
- Disassemble the box fan (same as the process we used in the “How to clean a box fan” section above
- Remove the cover that houses the motor
- Pop open the back of the motor – you might need to remove some screws first
- Take out the bearing
- Lubricate the bearing thoroughly and spin it a couple of times to make sure the oil get in deep
- Wipe of oil that’s too excessive or dripping
- Put the bearing back into the motor
- Replace the back cover and protective housing cover
- Put the fan back together
There are a couple of different oils that you could use. My favorite is the gear oil. The choice is yours. It might be better for you to test out a couple of different types to see what works best for your fan.
You should make oiling your fan part of your regular fan maintenance schedule. It’ll lengthen the life of the fan and keep it working at its best for longer.
How to Take Apart a Box Fan
These steps will also work if you want to know how to take apart a Pelonis box fan. This is an important part to get right if you’re learning how to clean a box fan. Getting this wrong can make it far harder to clean the fan quickly and easily.
Here Are the Steps You Need to Follow:
Step 1: Turn of the Fan and Remove the Power Adapter
Removing the power adapter isn’t possible on all box fans. If it isn’t, make sure you unplug the fan at the wall. If you can remove the power adapter cable, then do so. It’ll make it easier to remove the screens and handle the fan.
Step 2: See What’s Holding the Fan Together
Briefly inspect the screens of the fan (the grates that protect the fan). Look around the sides to see how the fan is held together. If it’s held by screws, you need to get the appropriate screwdriver.
If it’s held together by plastic tabs and clips (metal clips are also common), then you might need a flathead screwdriver to get them open.
Many of the better quality box fans are held together by a combination of plastic/metal clips and tabs and screws.
Step 3: Remove the Screens
This is the easy part. Use the screwdriver to remove all the screws on one side of the fan. Unclip any plastic tabs that are still holding the screens in place. Remove the screen from the fan and put it aside.
Flip the fan over carefully and remove the screen from the reverse side of the fan.
Step 4: Remove the Fan Blades
There might be a screw holding the blades in place. Remove the cover and take the screws out. Once this is done, gently lift the blades out their place and lay them down somewhere safe.
- Our Handpicked Favorites for Best Box Fan to Live in Comfort
Final Thoughts
 That’s it for the guide! Well done for taking the initiative and time to learn how to clean, oil, and take apart a box fan. You’re ready to take what you’ve learned and put it into practice.
It might be a little slow the first couple of times you try it, but you’ll get the hang of it quickly.
It’s always important to take care of your property, regardless of how inexpensive they are.
Maintaining your fan well will give it a longer life, save you money, and work at its best for as long as possible.
Take your new knowledge on how to clean a box fan and give it a try on yours – good luck!


