Setup a camping tent is tricky especially if you are new to this. But the thing is, you will get better with every pitch because practice is the key to bring up things perfectly. So, don’t fret if you don’t know how to set up a camping tent, you are going to know now.
In this piece of article, we have explained the very right ways to set different types of camping tents. Also, there are a few tips and answers to some frequently asked questions that you might find helpful.
Let’s get started without further ado.
The Most Common Types of Tents
There are varieties of sizes and shapes of camping tents, and every type requires a bit of a different setup process. This is why you should have eyes on the most common types of camping tents before we deep dive into the setup process.
- Dome: This type is typically inexpensive, easy to set up, and pretty lightweight. In these tents, two poles (flexible enough) bend back down to the ground and cross at the top. They are quite famous to today’s campers, however, they’re not much stable in high winds.
- Tunnel: There are a few numbers of curved poles that create here a long and tunnel-shaped structure. You will find them very comfortable, versatile, and roomy. However, they are heavy and unstable in high winds.
- A-Frame or Ridge: A-frame tents are classic and easy to set up. They have been used for years because of the sturdy build-up. In general, this type of tent counts on guylines for stability. However, modern models of camping tents contain aluminum tent poles.
Things to Look for While Choosing a Spot for Your Tent
You just cannot pick a random open place to set up your camping tent. There are some points that should be your concern before selecting a campsite. These are:
- Higher ground: Look for higher ground to use for your campsite where you have a good distance from any water source. Think about a rainy day, your tent can be soaked when the water level rises. So, a higher-ground spot will save your tent from getting wet.
- Level: Choosing a relatively flat and level ground will be the best for a campsite. Imagine you have set your tent on a slope and you just rolled to one end of your tent during sleeping, you never want it, right?
- Enough Space to Fit Your Tent: Make sure that the space is large enough to fit your tent. You may need to reset it if you choose a too-small space to fit the tent.
- Shade: A spot with some shade is vital when you camp in the summer. In case you set up the tent in direct sunlight, the tent may get unwantedly hot.
- Enough Distance from Grills or Fire Pits: For mandatory safety purposes, set your tent to maintain a safe distance from grills or fire pits.
How to Setup A Camping Tent
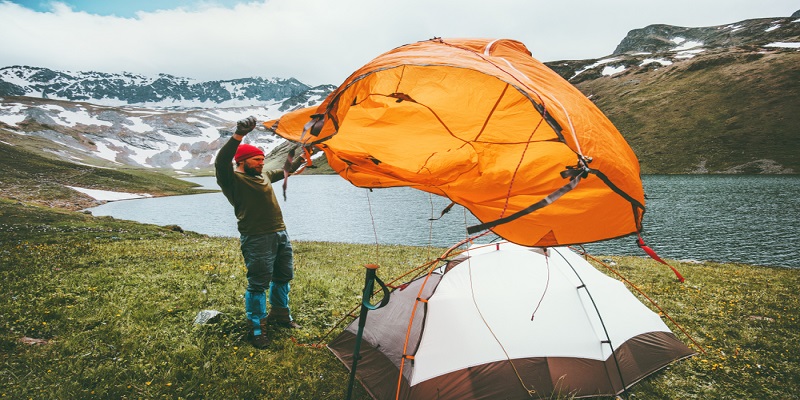
How to Setup a Dome Tent
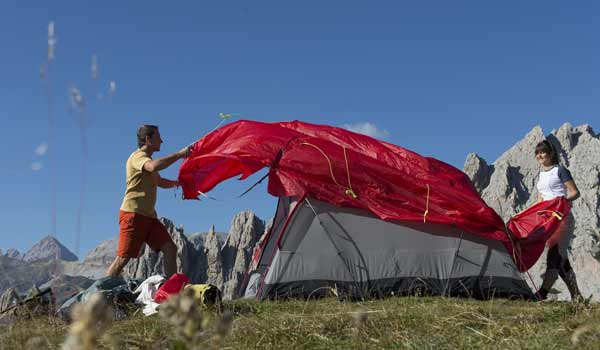
Now, it’s time to set your tent up! We are starting with the most common types of camping tents. Let’s have eyes on the steps you need to follow.
Step 1: Lay Your Tent
First thing first, see where the bottom of your tent is. Then, lay your tent on top of the tarp, make sure you position it in the right direction. Determine in which direction you need your tent doors to face- you’ll want to set your tent facing the doors away from high winds.
Step 2: Attach the Tent Poles
You will see the pieces of tent poles that you need to connect yourself. When you’re done connecting the poles, simply lay the poles across your flat tent.
Step 3: Insert the Tent Poles
Now, it’s time to insert the tent poles in the clips or sleeves on your tent. The position of clips and sleeves is different in different kinds of tents. You will notice them at the top of the dome tents, forming an X.
Find out the eyelet at each edge of your tent, then, insert the end of your tent poles into the eyelets. The next thing you should do is either attach the poles to your tent’s plastic clips or slide the poles through your tent’s small flaps.
However, carefully read the instruction manual of your tent to ensure that you are following the correct way to insert the poles.
Step 4: Raise Your Tent
If you are using a freestanding tent, it will stand on its own right after you connect the poles. For the other tents, you will need guylines to ensure stability.
When you correctly fit the tent poles into the right connection spots, they should bend as well as raise your tent on their own. However, some tents need a bit more temptation for standing up. The main thing that should be your concern is, the poles are secured.
Also, pull apart the tent’s corners and be sure that they are square.
Step 5: Reposition Your Tents As Needed
Before you stake the tent down or attach the guylines, it’s important to adjust the position of your tent. Be sure that the windows and the doors are facing in your desired direction. Moreover, your tent should be centered over the tarp.
Step 6: Stake Your Tent Down
Secure every edge of the tent using the tent stakes. Make sure you set the stakes at a 45° angle. For the soft or medium soil, using tent stakes is not a big deal. But if you are camping on hard or rocky ground, staking can be a headache for you. In this case, you can use a hammer or mallet to push the stakes into the ground.
Step 7: Set Up the Rainfly
Most of the tents have a guard against rain named a rainfly. You may need to clip a rainfly directly to your tent, or perhaps, you have to tie them above your tent, it varies from tent to tent. Be sure about it from the instruction manual of your tent.
Step 8: Tie the Guylines
Guylines ensure extra stability to keep your tents safe from high winds. Find the guyline points at first, they are some sturdy loops positioning halfway up your tent wall.
And, you are done setting up your camping tent!
Steps to Setup a Tunnel Tent
Setting up a tunnel tent is almost the same as a dome tent, the key difference is- the tent poles stay parallelly across your tent’s ridge.
Step 1: Position Your Tent
Lay your tunnel tent out over the tarp first. Be clear about the wind direction like the previous method.
Step 2: Stake Down the Corners
Now, use tent stakes to give your tent extra stability. Put the stakes into the ground at a 45° angle. Make sure each edge is staying tight enough.
Step 3: Secure Your Canopy
Once you are done staking all the four corners of your tent, peg the canopy down in front. Then, gather all the tent poles together.
Step 4: Insert the Tent Poles
Mark the sleeves that are on the sides of your tent. Then insert the tent poles into the sleeves. Starting with the two middle sections is a good idea. Because it will give your tent enough support as well as puts less pressure on the tent’s front poles.
Step 5: Raise Your Tent
Bend your tent poles so that they fit into their clips properly. Giving manual support to your tent will lessen the stress on the poles. Now, if you just clip them in along your tent’s sides, it will perfectly secure them in place.
Step 6: Attach the Guylines
Pull the guy lines tight. While you peg the guylines into the ground, make sure they are at a 45° angle.
That’s that! Now, you know the right way of setting up a tunnel tent!
How Can You Setup an A-Frame Tent?
This type of camping tent is old-fashioned. Yet, some backpackers prefer using this traditional tent type.
Step 1: Spread Your Tent
As usual, layout the tent over a tarp. While you are dealing with an A-frame tent, there’s no chance to reposition your tent once you pitch it, so it’s crucial to choose the location wisely.
Step 2: Stake Down the Edges
Are you done positioning your tent? If yes, stake down the edges of the tent. Do this job so precisely that the tent fabric seems stretched tightly.
Step 3: Attach the Tent Poles
Your A-frame tent either comes with one pole at each end or two poles, it depends on the design of the tent. However, both types contain an additional pole that stays horizontally along your tent’s ridge.
Step 4: Raise Your Tent
Once you raise the tent, you will see the poles at each end of your tent have built a triangle shape with the ground. This structure adds more stability to your tent.
Step 5: Tie the Guylines
And, it’s time to pull out the guylines tightly at both the front and back of your tent. Make sure the guy lines are tight enough to deliver the essential stability to your tent.
Step 6: Attach the Rainfly
If needed, there’s an option to place a rainfly over the tent. You need to use the guylines to stake the rainfly into the ground.
Now, enjoy staying at your newly set tent!
Additional Tips To Set Up A Camping Tent
To make your camping journey enjoyable and comfortable, you should have the right gear. If not, the whole camping may come as a nightmare. Here are a few tips that might help you in the whole camping trip.
- Before you go camping, practice setting up your tent at home. You can avoid the silly mistakes at the final campsite then.
- Follow some camping recipes and make campfire-friendly meals.
- Carry extra padding to make sure that your camping is comfortable enough. You can either bring an inflatable mattress or only a sleeping pad, just don’t forget to keep something like these.
- Waterproof your tent before you head out on the trip. You should never take risks because mother nature is full of surprises.
- Try to schedule your camping during the week instead of the weekend. Because during the weekend of summer days, campsites are generally filled with people (everyone wants a little escape from a busy lifestyle).
Frequently Asked Questions of Set Up A Camping Tent
Read More: How To Use Tent Stakes – Everything You Need To Know
Conclusion
Are you still tense about how to set up a camping tent? Hopefully, your answer is a big no since we left to stone unturned to make the job easy for you.
If you purchase the right tent (easy to install) and practice once twice to set up the tent at home, you can get the job done without making any mistakes. Also, make sure you choose the right spot for camping, it’s a huge chunk of setting up a camping tent.
Happy camping!